Saturday, February 2, 2013

Office makeover using fabric as inspiration and wall cover!

So as you all know, I live in a rental unit. This place has two bedrooms and a spare room that would work as another small bedroom, if it had heat. Naturally this little ice cube is my office. I use a space heater to warm it up when I am in there. Besides being a naturally occurring walk-in cooler, it's hideous on top of it.  Somehow it was deemed necessary to nail reclaimed two by fours to the wall as paneling around the room. I mean, why not, right?

Yuck.

Since again, we are not allowed to paint any surface of this space, I had to think of something else that would work. Upon examination I realized that the reclaimed wood walls were both porous and poorly installed. Plus they are spattered with paint and speckled with nail heads. Clearly aesthetics were not considered at any point from conception to execution of this ...we'll call it an "idea".


Look at all that lovely wood paneling...

Oh yeah, now that is sexy to look at.

Due to the inherent hideousness of the space, the fact that we will probably be moving on soon and also  that we're not "allowed" to permanently alter anything here, jazzing up the room might seem like an all-around waste of time (to anyone but me). Let's remember who we're talking about here - saying that a space shouldn't be made to look appealing just because it is temporary (to me) carries the same weight as saying Nutella shouldn't be eaten by the spoonful. It's just downright ridiculous!  (mmmm...Nutella...)

What to do, what to do.

That's when the thoughts started flowing. Wood. Nails. Nails, staples. Staples, staple gun. Staple gun, fabric. FABRIC! Yes, I had decided to cover these hideous wooden walls with fabric.

I emptied the place. I threw out the garbage. I went to the fabric store, found the perfect print and then stood impatiently in line behind a high schooler that was buying Sesame Street patterned anti-pill fleece to make what he exclaimed would be "the most amazing blanket ever" to his pimply faced buddy standing next to him. Ok, I didn't have to mention that they were pimply-faced, but they totally cut in front of me and then didn't offer their 40% off coupon to me when they realized they couldn't use it. I mean - come on! Chivalry is dead. Or it's at least in a coma.

Alright, alright - enough tomfoolery! Here are the results of my endeavors...
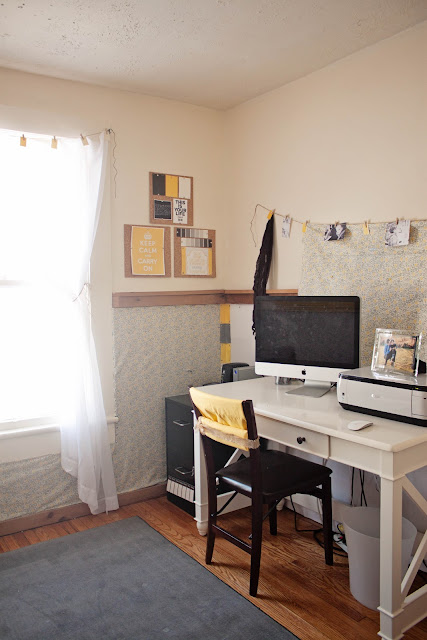
Tada! Bright and clean looking, no?

I just happened to already have that zig-zag beanbag ottoman! 

Now this is a space I can work in!
I love the way it turned out, and it was easy! The fabric was just the right width to go from the top ledge to the bottom trim. I used a heavy duty staple gun (borrowed) to affix the fabric to the wall starting at once side and moving all around the room. Silvery ribbon and thumb tacks were added for some pizzaz. Frames I already owned were filled with pictures I quickly printed off from my computer (I plan to get the real thing in there soon, haha) and researching online I found a bunch of inspirational quotes which I then edited to match my color scheme. Paint swatches from a hardware store got cut up and clothes pinned to my curtain and the make-shift clothes line I hung above my computer (this serves the dual purpose of looking cute and hiding my wireless router and coordinating mess of cords)

This project cost me less than $70. The only things I purchases was the fabric ($35...it'd have been less if I'd had that darn coupon...), rug ($20), ribbon, thumbtacks and cork board squares (around $10 for all). Everything else I moved around from other parts of my house! Even the pillow is repurposed (it's a brown pillow wrapped in one of my husbands old shirts! Then I used a gray ribbon that I had saved from a throw blanket I bought a while back and a piece of silver ribbon scrap that was left over from the wall project! VOILA! Brand new toss pillow!)

And some detail shots... 

Repurposed pillow :)

Faux clothes line with a scrap of fabric, paint swatch squares and black and white photos.

Photo collage of my son paired with zig zag pattern to match the ottoman ties the look together. 
Detail shot of the fabric and my ribbon/thumb tack embellishments.

When it comes time to move out of this place, a flathead and three quarters of an hour will make taking this home-decorating project easy to take down and remove all traces of. And it gets better - since the fabric is largely intact I will be able to reuse it to create a future project (or projects!), to really maximize my investment! Yeeehaaaaw.

Hope you enjoyed my office makeover! See you next time...


Sunday, January 13, 2013

Cute handmade gift that kids can make for family and friends!

Every year I try to think of something cute and easy that my son can "give" to family members as a gift from him. This year the gift came in the shape of white ceramic coffee mugs, dexterously designed by my little 3 year old budding artist.


Originally, the idea I found online was a tutorial on creating unique custom pieces of china using black permanent marker. I decided to take it a step further by using the gamut of colors that Sharpie's now come in and letting my pre-school-aged son do most of the leg work.

I started off by buying a variety of plain, white ceramic mugs from The Christmas Tree Shop. They were only around $2 each. I already owned a giant set of permanent markers in (likely) every color they make (shocker, right?) Then I washed and removed the stickers from each mug (ok, so maybe I "forgot" a couple in my haste to have my 3 year old create works his masterpiece(s), I am human after all!)


I was hoping he'd be much more into coloring on the mugs than he is other types of artistic expression, but alas, it was a struggle to get him to cooperate with my master plan! Luckily I started the project weeks before the holidays hit so I was able to spread out the project and get him to scribble  on the mugs here and there. (If your child makes a mistake or wants to start over, simply wash the marker off and start again - it's that easy.) That's not to say that I had these little boogers done before Christmas Eve....um, because they definitely were....not.

'Twas the night before Christmas and I, inside my small dwelling, launched a desperate attempt to complete gifts (without yelling)! 

*Ahem*

After decorating the mugs with marker they need to bake in an oven set to 350 degrees for approximately 30 minutes. This process will seal in the color. But be forewarned - this personalized gift will only hold up to hand washing. A dishwasher gets far too hot and the delicate design may be lost forever down the drain! I added a note about this with each mug we gave away, which you may want to consider as well if you are tackling this project.

Here are our mugs baking:


And a shot of the note I made up to go along with each mug. The top hand prints are just borrowed from the internet, a quick google search for child's hand prints brings them up. 


Fun, right?

Not only that, but they are inexpensive, fool-proof and really sentimental! These can be stuffed with the recipient's favorite brand of tea, coffee or hot chocolate, some miniature marshmallows, chocolates, candy canes - you name it.

Everyone that received one, loved it! (Oh, and I also saved one for myself, teehee) :)

Have fun creating something with your little one that will certainly be cherished long past his scribbling days.