Saturday, February 2, 2013

Office makeover using fabric as inspiration and wall cover!

So as you all know, I live in a rental unit. This place has two bedrooms and a spare room that would work as another small bedroom, if it had heat. Naturally this little ice cube is my office. I use a space heater to warm it up when I am in there. Besides being a naturally occurring walk-in cooler, it's hideous on top of it.  Somehow it was deemed necessary to nail reclaimed two by fours to the wall as paneling around the room. I mean, why not, right?

Yuck.

Since again, we are not allowed to paint any surface of this space, I had to think of something else that would work. Upon examination I realized that the reclaimed wood walls were both porous and poorly installed. Plus they are spattered with paint and speckled with nail heads. Clearly aesthetics were not considered at any point from conception to execution of this ...we'll call it an "idea".


Look at all that lovely wood paneling...

Oh yeah, now that is sexy to look at.

Due to the inherent hideousness of the space, the fact that we will probably be moving on soon and also  that we're not "allowed" to permanently alter anything here, jazzing up the room might seem like an all-around waste of time (to anyone but me). Let's remember who we're talking about here - saying that a space shouldn't be made to look appealing just because it is temporary (to me) carries the same weight as saying Nutella shouldn't be eaten by the spoonful. It's just downright ridiculous!  (mmmm...Nutella...)

What to do, what to do.

That's when the thoughts started flowing. Wood. Nails. Nails, staples. Staples, staple gun. Staple gun, fabric. FABRIC! Yes, I had decided to cover these hideous wooden walls with fabric.

I emptied the place. I threw out the garbage. I went to the fabric store, found the perfect print and then stood impatiently in line behind a high schooler that was buying Sesame Street patterned anti-pill fleece to make what he exclaimed would be "the most amazing blanket ever" to his pimply faced buddy standing next to him. Ok, I didn't have to mention that they were pimply-faced, but they totally cut in front of me and then didn't offer their 40% off coupon to me when they realized they couldn't use it. I mean - come on! Chivalry is dead. Or it's at least in a coma.

Alright, alright - enough tomfoolery! Here are the results of my endeavors...
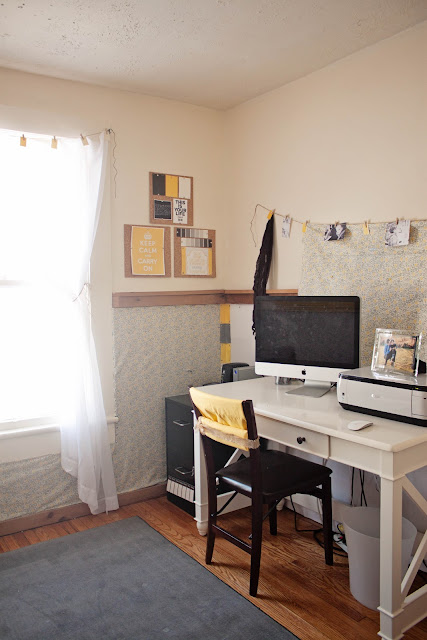
Tada! Bright and clean looking, no?

I just happened to already have that zig-zag beanbag ottoman! 

Now this is a space I can work in!
I love the way it turned out, and it was easy! The fabric was just the right width to go from the top ledge to the bottom trim. I used a heavy duty staple gun (borrowed) to affix the fabric to the wall starting at once side and moving all around the room. Silvery ribbon and thumb tacks were added for some pizzaz. Frames I already owned were filled with pictures I quickly printed off from my computer (I plan to get the real thing in there soon, haha) and researching online I found a bunch of inspirational quotes which I then edited to match my color scheme. Paint swatches from a hardware store got cut up and clothes pinned to my curtain and the make-shift clothes line I hung above my computer (this serves the dual purpose of looking cute and hiding my wireless router and coordinating mess of cords)

This project cost me less than $70. The only things I purchases was the fabric ($35...it'd have been less if I'd had that darn coupon...), rug ($20), ribbon, thumbtacks and cork board squares (around $10 for all). Everything else I moved around from other parts of my house! Even the pillow is repurposed (it's a brown pillow wrapped in one of my husbands old shirts! Then I used a gray ribbon that I had saved from a throw blanket I bought a while back and a piece of silver ribbon scrap that was left over from the wall project! VOILA! Brand new toss pillow!)

And some detail shots... 

Repurposed pillow :)

Faux clothes line with a scrap of fabric, paint swatch squares and black and white photos.

Photo collage of my son paired with zig zag pattern to match the ottoman ties the look together. 
Detail shot of the fabric and my ribbon/thumb tack embellishments.

When it comes time to move out of this place, a flathead and three quarters of an hour will make taking this home-decorating project easy to take down and remove all traces of. And it gets better - since the fabric is largely intact I will be able to reuse it to create a future project (or projects!), to really maximize my investment! Yeeehaaaaw.

Hope you enjoyed my office makeover! See you next time...


Sunday, January 13, 2013

Cute handmade gift that kids can make for family and friends!

Every year I try to think of something cute and easy that my son can "give" to family members as a gift from him. This year the gift came in the shape of white ceramic coffee mugs, dexterously designed by my little 3 year old budding artist.


Originally, the idea I found online was a tutorial on creating unique custom pieces of china using black permanent marker. I decided to take it a step further by using the gamut of colors that Sharpie's now come in and letting my pre-school-aged son do most of the leg work.

I started off by buying a variety of plain, white ceramic mugs from The Christmas Tree Shop. They were only around $2 each. I already owned a giant set of permanent markers in (likely) every color they make (shocker, right?) Then I washed and removed the stickers from each mug (ok, so maybe I "forgot" a couple in my haste to have my 3 year old create works his masterpiece(s), I am human after all!)


I was hoping he'd be much more into coloring on the mugs than he is other types of artistic expression, but alas, it was a struggle to get him to cooperate with my master plan! Luckily I started the project weeks before the holidays hit so I was able to spread out the project and get him to scribble  on the mugs here and there. (If your child makes a mistake or wants to start over, simply wash the marker off and start again - it's that easy.) That's not to say that I had these little boogers done before Christmas Eve....um, because they definitely were....not.

'Twas the night before Christmas and I, inside my small dwelling, launched a desperate attempt to complete gifts (without yelling)! 

*Ahem*

After decorating the mugs with marker they need to bake in an oven set to 350 degrees for approximately 30 minutes. This process will seal in the color. But be forewarned - this personalized gift will only hold up to hand washing. A dishwasher gets far too hot and the delicate design may be lost forever down the drain! I added a note about this with each mug we gave away, which you may want to consider as well if you are tackling this project.

Here are our mugs baking:


And a shot of the note I made up to go along with each mug. The top hand prints are just borrowed from the internet, a quick google search for child's hand prints brings them up. 


Fun, right?

Not only that, but they are inexpensive, fool-proof and really sentimental! These can be stuffed with the recipient's favorite brand of tea, coffee or hot chocolate, some miniature marshmallows, chocolates, candy canes - you name it.

Everyone that received one, loved it! (Oh, and I also saved one for myself, teehee) :)

Have fun creating something with your little one that will certainly be cherished long past his scribbling days.

Saturday, October 27, 2012

Unique Kid's Halloween Costume - Carl Fredrickson from the Pixar movie "Up!"

I've been told I don't update my blog often enough, so here I am with a personal entry about my son's Halloween costume conception through execution!

My son is recently turned 3 years old, and the concept of Halloween is non-existant (no matter how emphatically I try to explain it to him), and he is also very particular about what he will and will not wear - so this presented a costume challenge. Toss in the fact that I make it my mission to be original and resourceful made it even more so!

Lately my son doesn't like to wear any type of hoodie, hat or other dome covering garment. So I knew that a costume based largely on a headpiece to distinguish exactly what "it" was would inevitably result in a 35" tall headless [dinosaur/elephant/fill in the blank/etc.] running around the block and that wouldn't make for the adorable photo-op I had in mind.

I wanted to try and base the costume on something he has an interest in as well, without going too crazy (ha!) as I am extremely crunched for time as of late.

While in the shower recently, the idea hit me (why is it that I am always coming up with my best ideas in the shower?) A recent favorite movie around here is Pixar's animated film "Up", which stars a grumpy, bow-tie touting old man who dreams of adventuring to Paradise Falls, and does exactly that by floating his house via thousands of helium filled balloons from his hometown (Somewhere, USA) to South America with the help of a badge seeking boy scout and a talking dog named Doug.

Got that?


The costume is perfect because it is essentially just normal clothes with a couple of accessories (black-rimmed glasses and a grape soda bottle cap "pin"). But since I am crazy (yes, crazy) and can't keep things simple, I decided to create a replica of the house itself for us to pull along behind us on Halloween night to really kick up the cuteness factor of this costume idea!

I used a large moving box and a smaller one to construct the house and then spray painted the whole thing white. Then used cheap acrylic paints that I've had for years, and some crayons designed it to look like a picture I had printed off the internet.

I found a tiny suit at Kohl's and purchased a child sized bow-tie to go with it. Then I ordered black-rimmed "nerd" glasses online and voila! All I was missing was some colorful balloons...my nearest grocery store fixed that - so of course, I had to do a photo shoot.

Here is my tiny Carl Fredrickson, dressed to impress and ready to float away on his many adventures!


I am so pleased with the way this turned out. And the best part is that I reused a box (yay for recycling) and my son can wear the suit again for the holidays or some other special occasion! Win, win.

So when you are considering what to dress your child up as for Halloween this year or next...think outside the box (no pun intended!)

Hope everyone has a fantastic Halloween :) Until next time....


Friday, September 14, 2012

Custom Watercolor Name Painting - Step into my world!

So I've been wanting to share a step by step of a custom watercolor name painting that I so love to do! I've done many different designs for different people and every single one is unique and fun. I always end up loving the result so much, and all of my clients do, too! Sometimes it's hard to part with a painting, but knowing that it's going to a child that will love it more than I do makes it a little easier!

So first things first is I set up my work station. (Yes! I do paint on the floor!) I've got watercolors, a jar of water, paper towel, paint brushes, a plate (my palette) an actual palette, watercolor paper and watercolor pencils. I also usually have some inspiration to draw from, like a book or picture printed off the internet. This mom requested an "Eric Carle-ish" theme, featuring The Very Hungry Caterpillar.

I have actually done two paintings similarly inspired in the recent past, so I just used those as my inspiration. And it goes like this...

My work area:


And then step by step I add one thing and then the next to the blank canvas before me. I started with the caterpillar as a "C" and then added an orange and a plum for "O"s. Then a couple of standard letters in a kid-esque font and went crazy with the colorful dots! I went back to add in some depth and detail at the end with my colored pencils.

What do you think?


The little dots were the funnest part to make :)

I always recommend matting everything! All of my paintings go matted to clients, but my photos don't. There's nothing that draws attention to a piece of art quite like adding a beautiful, complimentary mat to it!

And of course, an artistic shot:


So if you want to make a painting like this for YOUR child, roll up your sleeves and get going! Or if you want me to make one for you, contact me! This isn't just a hobby for me, it's my passion :)

Until next time, friends!

Thursday, August 2, 2012

More wall art on the cheap! Create something funky for free!

So a few weeks ago I was slated with the task of updating the look of my sister's wine and dessert bar, Bittersweet. So of course instead of purchasing new artwork to hang on the walls - I made some!

You can make something unique and fun for your home just as easily and you can use things you already own and free stuff to make it a project that doesn't break the bank!

All you need is some picture frames (I recycle ones that are already on the wall with new, updated artwork), scrapbook paper or wrapping paper in a shade or design you love, some clipart and your printer, and paint sample squares from your local hardware store!

The color scheme at Bittersweet is pink, cream and brown - and here are some samples of what I came up with:


Pretty spiffy, huh? 

The background of these images are simply scrapbook paper from a collection that came in a huge book - paper I already had. If you go to a craft store you'll find a HUGE array of these books and individual sheets you can purchase. Depending on the size of the project I would recommend getting a book since the shades of the pages usually coordinate really well together and that takes out some of the guesswork as to which paint sample colors to choose when you head over to Lowe's or Home Depot!

Before I assembled the pictures, I went online and searched for wine glass, wine bottle and corkscrew clipart files. Once I found a few that I liked I put them into my editing program (you can probably use them black if you don't have a program to change the colors) and clicked around until I found colors that I liked. Then I printed off a few sheets. I also printed off words like "chocolate", "cheers!" and "drink and be merry!", just to go with the wine and dessert theme.

Finally I hit up the hardware store. I used about 10 to 12 paint sample swatches for the large 16x20 frames and half that many for the smaller 8x10 frames. As long as you stay in the same color "family" pretty much any shade of your favorite colors will look nice together. Here I used a variety of browns, pinks and whites/creams - and it worked out great.

Take all your supplies and just mess around with the composition and arrangement of individual components until you like the way it looks. Then adhere it and flip it into the frame. You're done! 

This project only takes minutes to complete, and its so super easy - anyone can do it!

Check out more samples of different collages I created: 


Mix it up by adding some paint or ribbon, and bits of newspaper or other printed material. You can even go more extreme and do a full blown collage like the image below:


I dipped a cork in brown paint to create the circles and then used a bit of pink paint and the bottom of a wine bottle to create the larger rings! 

If that all seems too complex, just keep it simple by using a single colored sheet as the background, a few paint sample chips and a silhouette of silverware, like this: 


So many ways to make it your own! Experiment!

Hope this gives you some ideas or inspiration to change up the decor in your business or home! Have fun! Oh, and if you're ever in the Syracuse, NY area - hit up Bittersweet for yummy wine and homemade desserts (I might even be the one serving you, if you are lucky!) 

Until next time.... :)

Tuesday, May 22, 2012

Funky Wall Art - Cheap, removable and fun to make!

So, I move. A lot. A lot of times I end up in rental units that won't allow changes to be made to the wall color. (These people are crazy, though - they haven't seen what I can do with a gallon or two of earth toned liquid latex)

I like to decorate, it's not a secret. So of course I am always trying to figure out how to make my space both livable and beautiful. We just moved into an old apartment in a two family home. The house is beautiful and quirky. It's got glass and marble doorknobs and the floors slant all sorts of sideways (it's a little fun-housy, I'm not gonna lie). There aren't any light switches anywhere, just lamps with pull strings or knobs to twist, and of course they are all way inside the rooms where finding them in the dark is nearly impossible.

They also pose a design challenge. There is one particular area, in our living room, where the two conjoined walls each have a light fixture and coordinating awkward space between them. I pondered to myself what could go up on those walls that wouldn't look strange.

Then it hit me. You know those decals that are becoming popular? (I've mostly seen them in kid's rooms and the pediatricians office, in the shapes of popular animated characters - you know the type) Well I started my usual googling to find that they are really expensive! I mean, for sheets of sticky paper that are massed produced and meant to eventually be thrown away!

Anyhow - I thought "How hard can it be to make something like that myself?" And the answer was: not hard at all! All you need is a couple of supplies and a couple of hours (and perhaps a touch of patience couldn't hurt!)


I decided to go with a tree growing in the corner motif. In the photo above you can see a hint of the wall fixture I'm talking about that was in. my. way!

I went to (large discount super store name of your choice) and purchased a roll of white shelf lining paper, or contact paper as some of you may refer to it as. I was looking for black, but that is hard to find in the stores and buying it online wouldn't serve my Instant-Gratification-Syndrome. Plus white is cheaper ($5.50!) and comes in way longer rolls. Buying the plain white came with the added bonus of being able to paint the sheets any color I want. This is a great example of the accidental occurrences that happen along the way in a project that make it turn out even better than imagined and more unique to boot!

So, white contact paper - check. Acrylic paints left over from college that are all clumpy and weird, but still work - check. Time - well, I squeezed some out somehow, mostly after my son was already in bed.

Steps

Get an idea. Mine was the tree pattern.

Paint a 3 feet area of paper with your colors of choice. I did black mixed with brown and then splotched it with a paper towel to see some of the white underneath. Then I folded the paper in half to get a cool texture effect. Mess around with it. Be wild.

Let the paint dry (this is the hardest part for me - I don't like waiting.....hence why I may have discovered the cool paper towel blotching effect when I was just trying to speed up this process...hehe).

Cut up the paper into the shapes so desired. This contact paper is great because you can overlap to create the correct shape and you can't even see it unless you are within a couple inches of the design. Also the way I painted my paper helped camouflage any imperfections.

Peel and stick. (You may want to test an area first just to make sure these will remove, but from all the experience I've had with shelf-lining paper...well...let's just say low level of stickiness has always been one of my biggest peeves about it!)


Bare tree branches, leaves and details of the final product

That's it! 

The room isn't quite ready yet, but I am so excited about my little decorated corner and wanted to share it with you. I'm thinking about adding a colorful accent somewhere on it, perhaps a red or blue bird, just for a tiny little twist. Best part about this is that I've got about 90% of the roll left (more projects in my future, I'm sure), my room looks custom decorated and when I move out of this place I won't have to worry about repainting any walls. 

It's a win all around!

Saturday, April 21, 2012

How to make your own photo business cards - for free! (or close enough!)

So I have recently embarked on a new adventure. I am attempting to start a photography business. I have always loved taking pictures and wondered if it were possible to make my adoration for the camera into a career.


I have had a DSLR for about a year now, and just six months ago I took the plunge and put my camera in Manual mode. I am ashamed to admit I had no idea the power that was in my possession until I made that tiny adjustment. Tiny because it was a click or two from the "auto" mode or "portrait" mode. But really I couldn't fathom what an enormous change that little click would make in my photographs.

Fast forward to today and I feel like I'm getting a good handle on what I am doing. I love learning more and more and I hope to get better and better. But here's the thing - I don't have the cash flow necessary to start a business right now.

Recently I was at the bookstore browsing around and found a book I had seen mentioned by one of my sisters. The title is "Steal Like an Artist". Naturally, fancying myself an artist, I wanted to see what exactly that meant. The book is a great and quick read, and I recommend it to anyone trying to be anything. One of the biggest take aways for me was "Fake it til you make it", or if you want to be something pretend you are that thing and eventually you will be. That's what I'm trying to do.

Another tip they mentioned was that when faced with too many choices, a person can go crazy just trying to decide. This is one of my main problems. I don't have a focal point - I don't know what direction I should be going in. I love doing so many different things. The author's suggestion at facing this challenge is to put yourself in a situation where you don't have a choice. To limit yourself. To make a painting using only one color or start a business with no capital. Ding! Ding! Ding!

So here I am, trying to take on that challenge.

Firstly I have created a free gmail account for all of my business related emails. Next I created a Facebook page (here it is if you are interested). Both of these were free and easy to set up. Of course I want a big fancy website and I even started a free trial at a site specifically geared towards photographers. But once the trial is over they want $250.00 to make my site a reality. And I just don't have the dough right now.

The next thing on my list is some kind of advertising. And that's where the business cards come in.

I got a terrific idea from some ladies on a photography forum that I am a part of. They suggested a site where I could buy these awesome cards with a photo on one side and my info on the other. Brilliant! They look beautiful and they showcase my work! I ordered a bunch of samples and am waiting for them in the mail...and then it occurred to me: I can't afford to actually buy these fancy business cards!

So of course, I made my own. Here is the final product:


I know, I know - they look fantastic, right??

All I had to do was make up a template at the correct business card size, drop my photo of choice in there and then take that whole thing to another 8 1/2 x 11 sheet, where I made a center line and put a card on each side of it. Two columns and five photos in each makes 10 cards per page. Then I made the back up using the same business card template to make sure all of my info fit. Dragged those over and copied them ten times over, placing them so that they will print exactly on the backs of each image.

I test printed the sheet of photos to check alignment and coloring and then stuck it back in the printer, blank side up to test the info side. When it all check out ok, I just upped the quality of the print, stuck in some heavy white card stock and let them go! 

Of course, I did have to whip out my handy dandy paper cutter (yes, the one I used to hand cut all 6 layers of all 120 of my wedding invitations back in the day). You need a steady hand and a little finesse, but anyone can do this. And the best part is that it took me the better part of an hour, a few sheets of paper and minimal amounts of ink. That's it!

Now I have something to start handing out to potential clients, and I am so excited!